The Best Insulation for Existing Homes
The Best Insulation for Existing Homes
Select your siding type and watch these short install videos to see how RetroFoam is installed from the outside or the inside.
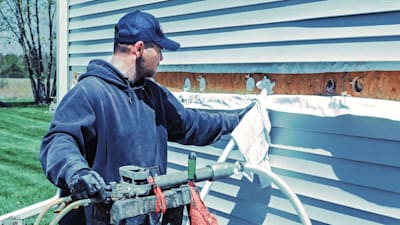
Whether your home has aluminum or vinyl siding, the process to install RetroFoam injection foam insulation is the same.
The installers will remove a row of siding around the entire home. Generally, a 2 ½-inch hole is drilled into each of the stud cavities, and the foam is injected. The installer will run the injection hose up to the top of the cavity and begin injection. Once they get to the middle of the cavity, they will then run the hose from the bottom to the middle. This method ensures the cavity is completely filled.
Once the injection process is complete, the holes drilled into the sheathing are plugged, and the siding is replaced.
The insulating brick exterior process is obviously different from other siding materials as it doesn’t make sense to remove brick to gain access to the wall cavity.
In this installation process, three 5/8-inch holes are drilled into the mortar to reach the wall cavity. A hole is drilled at the top, middle, and bottom. This ensures the foam is injected into the cavity and completely fills it.
Once the foam has been installed, the holes are filled with mortar.
The condition of the wood siding will decide how the installation of the injection foam is done.
If the wood is in good condition, it can be removed, and the holes would be drilled into the sheathing underneath. Once the installation is complete, the holes are plugged, and the wood siding is replaced.
If the wood is brittle, there is the chance it could break, so it makes more sense to just drill through it.
In both cases, the actual injecting of the foam is the same as vinyl or aluminum siding – the hose is run from the top to the bottom to ensure the foam completely fills the cavity.
The installation process for concrete block walls involves drilling holes into the middle of the wall to access the cores.
The bricks' cores are lined up, so once the holes are drilled, injecting the foam fills those, as well as any other nooks and crannies.
Once the cores and openings are filled, the holes are filled with mortar.
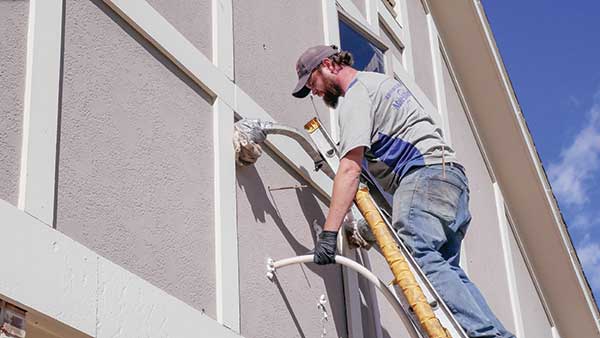
When insulating homes with stucco siding, three 5/8-inch holes are drilled at the top, middle, and bottom of each cavity.
This method ensures the wall cavity is completely filled with foam.
After the holes have been drilled, the foam is injected into the wall through each hole. Once the job is done, the holes are filled with mortar.
When installing RetroFoam from the inside, the prep is vital as you don't want to have drywall dust all over everything.
Your installer will make sure all surfaces and items in the area of the home where the injection foam will be installed are covered in plastic.
Once everything is covered, the installer will do a chalk line on the walls and drill the holes centered on that line.
The installer then runs the hose up to the top of the cavity and begins injecting the foam. The hose is run from the top to the middle and from the bottom up to ensure the cavity is full.
Once the foam has been installed, the holes are plugged, and a rough patch of drywall mud is applied.
Removing Hardie board siding during installation is more complex than vinyl or aluminum.
The installation crew will carefully lift the board to expose the nails. If the nails are difficult to remove, the nail heads may need to be cut off. Any existing caulk must also be removed.
Once the siding is removed, the foam is injected, and the holes are plugged. Then, the Hardie board needs to be replaced.
Reinstalling the Hardie board is a process that shares similarities with vinyl or aluminum, but it does involve a few additional steps that are unique to Hardie board siding.
If all the nails come out easily, the crew will reuse the same holes to drive the nails through. If the nail heads had to be cut off, the crew would need to create new holes. Additionally, the crew must re-caulk around the siding once the installation is complete.
If your house has cedar shake siding, the RetroFoam installation process adapts to fit your home’s unique structure.
The RetroFoam installers carefully remove each shake piece or score the top for a clean removal. Holes are then drilled into the sheathing into each stud cavity. The foam is then injected to ensure the entire cavity is filled.
Once the installation is complete, holes are plugged, and each shake is meticulously reattached to maintain the original look.
Yes, it can.
In the case of garage common walls, the installation is done from inside the garage. There are also instances where a homeowner may not want their siding or home exterior drilled into, so installation from the inside is the better option.
Yes.
In fact, many homeowners decide to have these walls insulated to help dampen the sound coming from other rooms.
While rare, yes, this can happen.
When meeting with your local RetroFoam dealer, discuss your concerns so you can make sure you’re both on the same page. Learn more.
In most cases, installing RetroFoam into exterior walls can be done in a day or less.
The bigger the home, the longer the installation can take.
RetroFoam injection foam will compress the old fiberglass as it fills the wall cavity.
You can ask the previous homeowners, or if that’s not an option, removing the cover of an outlet can get you access.
You can also drill a small hole somewhere inconspicuous, like in the closet. Learn more.

RetroFoam injection foam insulation is a premium and safe product installed in tens of thousands of homes across the country since 2001.

Your local RetroFoam dealer has been specifically trained on installing RetroFoam into existing walls, working with all siding and exterior types.

The convenient RetroFoam install process allows homeowners to improve their home comfort and energy efficiency greatly.
Ryan W.